


Pressure ulcers are a significant concern in nursing care, particularly among patients who have limited mobility. Identifying patients who are at risk and documenting their condition accurately are important parts of safe nursing practice.
For candidates preparing for the NMC OSCE, the Pressure Area Assessment is an important station because it tests your ability to interpret patient information, assess pressure-ulcer risk systematically, use the appropriate scoring tool, and document your findings accurately.
The Pressure Area Assessment station can initially appear challenging because it requires you to process several pieces of information within a limited period. However, once you understand the structure of the assessment and become familiar with the Braden scoring tool, the station becomes much easier to approach.
This guide provides a comprehensive overview of the NMC OSCE Pressure Area Assessment station, including the station format, the six Braden assessment elements, scoring approach, pressure-risk areas, signs of pressure-ulcer development, documentation requirements, common mistakes, and practical examination tips.
What Is the NMC OSCE Pressure Area Assessment Station?
The Pressure Area Assessment is a silent NMC OSCE station.
Unlike stations where you communicate directly with a patient or interact with an examiner, this station involves working from the information provided to you as a scenario. You will be presented with a patient scenario and documentation chart, and you will need to interpret the information and complete the assessment.
According to the provided reference, candidates have 8 minutes to complete the station.
The key tasks include:
- Reading and interpreting the patient scenario.
- Identifying information relevant to pressure-area risk.
- Understanding each component of the pressure-area assessment.
- Assigning the appropriate score for each element.
- Calculating the total score.
- Documenting the score accurately.
- Documenting at least 8 areas of pressure risk.
- Documenting at least 7 signs of pressure-ulcer development.
Because this is a silent station, there is no patient interaction to guide you through the process. Your ability to read carefully, identify relevant information and document systematically is therefore particularly important.
Understanding the Braden Scoring Tool
The Braden tool is used to assess different factors associated with pressure-ulcer risk.
The reference material identifies six assessment elements:
- Sensory perception
- Moisture
- Activity
- Mobility
- Nutrition
- Friction and shear
Each element has different descriptive categories. Your task in the NMC OSCE is not simply to memorise the categories. You need to match the information in the patient scenario to the correct category and then record the corresponding score.
The six elements should therefore be approached individually.

1. Sensory Perception
What does sensory perception mean?
Sensory perception refers to the patient’s ability to respond meaningfully to pressure-related discomfort.
In the OSCE, you need to identify how well the patient can respond when they experience discomfort associated with pressure.
The reference explains that the score is based on the patient’s ability to respond.
The Braden chart includes four categories:
- Completely limited
- Very limited
- Slightly limited
- No impairment
OSCE approach
When reading the scenario, look specifically for information about the patient’s ability to:
- Recognise discomfort.
- Respond to pressure-related discomfort.
- Communicate discomfort.
- React appropriately to sensory stimuli.
Do not select a category simply because the patient has a particular diagnosis. Base your decision on the information actually provided in the scenario.
2. Moisture
What does moisture mean?
Moisture refers to the degree to which the patient’s skin is exposed to moisture.
In the provided reference, particular attention is given to urinary incontinence when identifying the appropriate score.
The Braden categories include:
- Constantly moist
- Very moist
- Occasionally moist
- Rarely moist
OSCE approach
When reading the scenario, look for information about:
- Urinary incontinence.
- Frequency of moisture exposure.
- Whether the patient’s skin remains moist.
- How frequently the patient is exposed to moisture.
Remember that the question is not simply whether the patient is incontinent. You need to determine the degree of skin exposure to moisture described in the scenario.
3. Activity
What does activity mean?
Activity refers to the patient’s degree of physical activity.
The reference specifically identifies the following categories:
- Bedfast
- Chairfast
- Walks occasionally
- Walks frequently
OSCE approach
When reading the patient scenario, think:
How physically active is this patient?
Look for information indicating whether the patient:
- Remains in bed.
- Is able to sit in a chair.
- Can occasionally walk.
- Walks frequently.
Activity versus mobility
One of the most important things to understand is that activity and mobility are different assessment elements.
Activity focuses on the patient’s degree of physical activity, whereas mobility focuses on the patient’s ability to change and control body position.
For example, a patient may be able to sit in a chair but have significant difficulty changing their position. Therefore, do not automatically give the same interpretation to activity and mobility.
4. Mobility
What does mobility mean?
Mobility refers to the patient’s ability to change and control their body position.
The Braden categories include:
- Immobile
- Very limited
- Slightly limited
- No limitation
OSCE approach
Look for information in the scenario describing whether the patient can:
- Change position independently.
- Control their body position.
- Move themselves.
- Reposition themselves.
- Requires assistance with positioning.
Key distinction
Do not confuse:
Activity = How much the patient moves/gets around
with
Mobility = How well the patient can change and control their body position.
This distinction is particularly important when scoring the Braden assessment.

5. Nutrition
What does nutrition mean?
Nutrition refers to the patient’s usual food intake pattern.
The reference highlights the importance of considering:
- The quantity of food the patient consumes.
- Whether the patient is taking supplements.
The Braden categories include:
- Very poor
- Probably inadequate
- Adequate
- Excellent
OSCE approach
When reading the scenario, pay attention to information about:
- Food intake.
- Reduced appetite.
- Amount of food consumed.
- Nutritional supplements.
- The patient’s usual dietary pattern.
Do not overlook nutritional information simply because the station is primarily about pressure areas.
Nutrition is one of the six components of the assessment, so it must be considered carefully.
6. Friction and Shear
What do friction and shear mean?
Friction and shear relate to problems that can occur when the patient is being moved or requires assistance with movement.
The reference describes this element in terms of assistance in moving.
The Braden categories include:
- Problem
- Potential problem
- No problem
OSCE approach
Look carefully for information describing:
- Whether the patient needs assistance when moving.
- Difficulty with movement.
- Sliding or repositioning.
- Problems associated with moving the patient.
This category is different from mobility. Mobility describes the patient’s ability to change position, while friction and shear focus on difficulties and risks associated with movement and assistance.
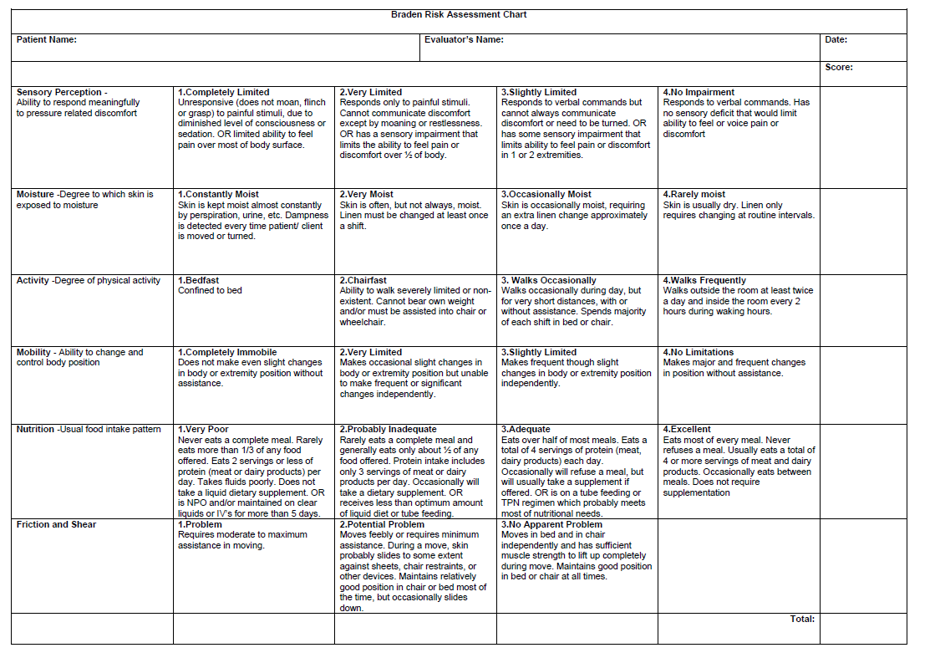
How to Approach the Scenario Systematically
One of the biggest advantages you can give yourself in the Pressure Area Assessment station is to follow the same process every time.
The reference recommends using a systematic approach and practising different scenarios.
A useful sequence is:
Step 1: Read the entire scenario
Do not immediately start writing after reading the first sentence.
Read the complete scenario first so that you understand the patient’s overall condition.
Step 2: Identify the six assessment elements
Look specifically for information related to:
S – Sensory perception
M – Moisture
A – Activity
M – Mobility
N – Nutrition
F – Friction and shear
Step 3: Match information to the chart
The reference advises candidates to identify each element’s score according to the information provided in the scenario and then match the details with the chart.
Step 4: Record each individual score
Do not jump directly to the total.
First ensure that each component has been scored correctly.
Step 5: Calculate the total
Once all six elements have been scored, calculate the total score.
Step 6: Complete the additional documentation
The reference requires documentation of:
- The total score.
- A minimum of 8 pressure-risk areas.
- A minimum of 7 signs of pressure-ulcer development.
Pressure-Risk Areas You Should Know for the OSCE
Another important component of this station is recognising areas that are particularly vulnerable to pressure.
The provided reference identifies the following areas:
- Heels
- Sacrum
- Buttocks
- Elbows
- Temporal region of the skull
- Shoulders
- Hips
- Back of head
- Toes
- Ears
- Spine
The station requires you to document a minimum of 8 areas of pressure risk.
A useful revision list is:
Heels – Sacrum – Buttocks – Elbows – Temporal region – Shoulders – Hips – Back of head – Toes – Ears – Spine
The important point is to ensure that your documentation contains at least the number requested in the station instructions.
Signs of Pressure-Ulcer Development
The second important documentation requirement is identifying signs that may indicate pressure-ulcer development.
The reference identifies the following signs:
- Persistent erythema
- Non-blanching hyperaemia
- Blisters
- Discoloration
- Localised heat
- Localised oedema
- Localised indurations
- Purplish/bluish localised areas
- Localised coolness
The station requires a minimum of 7 signs.
Documentation: The Most Important Part of a Silent Station
In a silent station, your documentation is your communication.
The reference makes this point particularly clear: although the Pressure Area Assessment station is silent, your documentation is extremely important.
Your documentation should be:
- Accurate
- Complete
- Neat
- Legible
- Systematic
You should ensure that you document each individual element rather than simply writing the final total.
Your documentation checklist
Before moving on, confirm that you have documented:
- Sensory perception score
- Moisture score
- Activity score
- Mobility score
- Nutrition score
- Friction and shear score
- Total score
- At least 8 pressure-risk areas
- At least 7 signs of pressure-ulcer development
This checklist reflects the key requirements identified in the NMC OSCE.

Time Management: You Have 8 Minutes
The Pressure Area Assessment station gives you 8 minutes, so time management matters.
The biggest mistake candidates can make is spending too much time on one part of the scenario.
A practical approach
You can divide your time mentally into stages:
First: Read and understand the scenario.
Second: Identify the six Braden components.
Third: Match each component to the appropriate category and score.
Fourth: Calculate and document the total.
Fifth: Complete the pressure-risk areas and pressure-ulcer signs.
Finally: Review your documentation.
You do not need to rush unnecessarily. Instead, maintain a consistent pace.
Common Mistakes Candidates Should Avoid
1. Starting to score before reading the full scenario
Candidates sometimes see one piece of information and immediately select a score.
This can lead to incorrect interpretation.
Better approach: Read the complete scenario before finalising the scores.
2. Confusing activity with mobility
These are separate components of the Braden assessment.
Activity relates to the degree of physical activity.
Mobility relates to the ability to change and control body position.
Keep the two concepts separate.
3. Ignoring nutrition
Candidates may concentrate heavily on mobility and pressure areas and overlook nutrition.
However, nutrition is one of the six required assessment elements.
4. Forgetting friction and shear
Because friction and shear may be less familiar than the other categories, candidates sometimes overlook it.
Make sure you assess all six components every time.
5. Documenting fewer than the required number of areas
The reference specifies a minimum of 8 pressure-risk areas.
Do not stop after writing only three or four.
Prepare a complete list during your revision.
6. Documenting fewer than seven signs
The reference specifies a minimum of 7 signs of pressure-ulcer development.
Learn more than the minimum so you have a reliable recall list during the examination.
7. Poor handwriting or incomplete documentation
Even if your interpretation is correct, incomplete or unclear documentation can undermine your performance.
The reference specifically advises candidates to neatly document all details and the score.
Practice Strategy : Use different scenarios
The reference specifically recommends practising different scenarios and scoring the elements.
For each practice scenario:
- Read the patient information.
- Understand relevant information.
- Identify each of the six components.
- Select the appropriate category.
- Record the score.
- Calculate the total.
- Practise documenting pressure-risk areas.
- Practise documenting signs of pressure-ulcer development.
The more scenarios you practise, the faster you will become at identifying key information.

A Quick Revision Framework
Before your OSCE, use the following framework:
READ → IDENTIFY → SCORE → TOTAL → DOCUMENT → CHECK
READ
Read the patient scenario carefully.
IDENTIFY
Find information relating to the six Braden elements.
SCORE
Match each element to the correct category.
TOTAL
Add the scores accurately.
DOCUMENT
Record the total, pressure-risk areas and signs of pressure-ulcer development.
CHECK
Review your documentation before the station ends.
This approach prevents you from forgetting an important part of the station.
Final Tips for NMC OSCE Students
The Pressure Area Assessment station is manageable when you approach it systematically.
Remember these key points:
1. It is a silent station.
You will work from the patient scenario and documentation rather than interacting with an actor.
2. You have 8 minutes.
Use the time wisely and avoid spending too long on a single element.
3. Understand all six Braden components.
Do not focus only on mobility.
4. Score according to the scenario.
Do not make assumptions that are not supported by the information provided.
5. Know the difference between activity and mobility.
6. Remember nutrition.
7. Do not forget friction and shear.
8. Document every individual score.
9. Calculate the total score carefully.
10. Document at least 8 pressure-risk areas.
11. Document at least 7 signs of pressure-ulcer development.
12. Keep your documentation neat and legible.
The reference emphasises that systematic preparation, understanding the Braden tool, scenario practice, time management and neat documentation are key to approaching the station successfully.
Conclusion
The NMC OSCE Pressure Area Assessment is a station where preparation and precision can make a significant difference. Although it is a silent station, it tests several important nursing skills: clinical interpretation, structured assessment, risk identification, scoring and accurate documentation.
The most important preparation step is to become familiar with the six Braden assessment elements: sensory perception, moisture, activity, mobility, nutrition, and friction and shear.
You should also be confident in identifying the vulnerable pressure areas and recognising the signs associated with pressure-ulcer development. In the OSCE, requires candidates to document a minimum of 8 pressure-risk areas and 7 signs of pressure-ulcer development, making these an essential part of your revision.
Remember that the station gives you 8 minutes, so practise completing the entire process within the available time.
Most importantly, do not treat this station as a simple memorisation exercise. Learn how to read the scenario, identify the relevant information, apply the Braden categories, calculate the score and document your findings accurately.
With repeated scenario practice, a systematic approach and careful documentation, you can approach the Pressure Area Assessment station with much greater confidence. As the reference highlights, mastering this station is not only about passing the NMC OSCE—it is also about understanding how structured pressure-risk assessment and accurate documentation contribute to protecting vulnerable patients from harm.

FAQ’S
1. How much time is provided for the Pressure Area Assessment station?
Answer: The candidate has 8 minutes to complete the station.
2. What are the six elements of the Braden assessment?
Answer: The six elements are:
- Sensory perception
- Moisture
- Activity
- Mobility
- Nutrition
- Friction and shear
3. What is the difference between activity and mobility?
Answer: Activity refers to the patient’s degree of physical activity, such as whether they are bedfast, chairfast, or able to walk. Mobility refers to the patient’s ability to change and control their body position.
4. Name at least eight areas at risk of pressure.
Answer: Examples include heels, sacrum, buttocks, elbows, temporal region of the skull, shoulders, hips, and back of the head. Other areas include the toes, ears, and spine.
5. Name at least seven signs of pressure-ulcer development.
Answer: Signs include persistent erythema, non-blanching hyperaemia, blisters, discoloration, localised heat, localised oedema, and localised indurations. Other signs include purplish/bluish localised areas and localised coolness
Read our recent blog – “SBAR Handover Elements: NMC OSCE Evaluation Station” – to ensure your journey stays on track.
Why Wait? Just Merlin It!
Free NMC CBT & OSCE Guide & Resources. Click the button Below :